I mentioned quite a while ago that I’ve been wanting to move to a self-hosted blog space and change the Street Style Wales name. Well, the time has finally come. You may have guessed by the name of this post that I’ve finally done it. I’ve moved to www.andshemade.co.uk. I’ll be posting the same content as I’ve been posting here, plus a little extra, so nothing much will change, although a change is as good as a rest, as they say.
I started Street Style Wales as a university project in 2011, although I’ve been blogging in total for eight years (!). The content has changed so much since that time, plus I’m not always in Wales these days, so the name hasn’t really suited the blog for a while. It took me sooooooo long to come up with the name but I got there and now I’m excited for the next stage of my blogging journey.
I don’t take any of my followers for granted and so I would really appreciate it if you could all follow me over to the new space. If you’d like, you can add my blog to your Bloglovin reader by clicking here, or update your other readers (WordPress etc). I’ve imported all the old posts over there so you can still find all the content you’re already used to.
So here’s to pastures new. So long Street Style Wales, it’s been a blast!
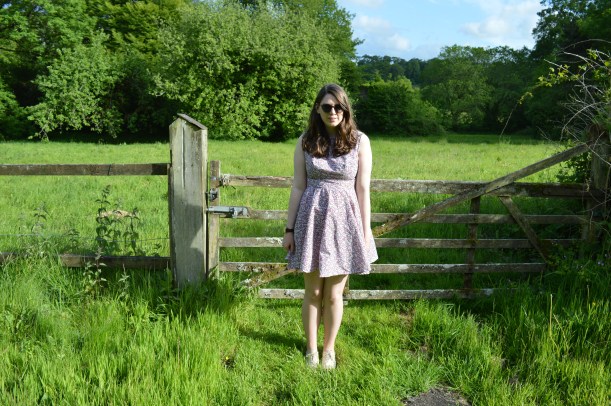
You all know by now how much I love the By Hand London sewing patterns. The Anna dress is a firm favourite, with its beautiful A line skirt. Having made quite a lot of dresses lately, I thought it was about time I mixed it up and made something different. I really love the shorter skirt from the Anna dress and it’s a great length for wearing to work, so I thought, why not make it into a skirt of its own?
I was lucky enough to be given some fabric remnants from the sewing editor at work and managed to cut out the skirt pattern using pretty much all of the fabric (I had to be quite crafty with my cutting skills). I altered the waistline and added in a shorter zip and here you have it, one Anna skirt.
I followed my normal size but somehow the skirt ended up being far too big, so I had to bring it in quite a bit. The length is great and I really love the print so overall it’s a really lovely skirt to wear, but next time I’ll definitely be a bit wiser when cutting the strips and measure my waistline correctly.
This dress was actually a freebie with Love Sewing magazine but it’s such a great make that the magazine rereleased the pattern a few months ago. I got mine on its original run but stashed it away for a future make. Recently I found some fabric I didn’t have a use for and, on a break from another sewing project, I decided to make it.
I’m glad I did as I really love the shape of the dress and it has a great circle skirt. One major thing I’d change (and should have done differently this time but I didn’t have enough fabric) is lengthen the skirt considerably. I really don’t like the dress length at all and even in the drawings it appears to be short. I think that’s even why I didn’t use the dress pattern straightaway. Looking at these photos I think next time I’ll also lengthen the bodice. I wonder whether other people have felt the need to lengthen the pattern?
I’m definitely planning to make more Rubies, especially as they’re perfect for the hot weather that we’ve been having lately! I guess next time I’ll order far more fabric to be able to make these changes.
Ahh, Pinterest! The bane of my life crafter’s best friend!
I thought it would be nice to include an occasional round-up of what I’d like to make, considering Pinterest plays a huge part in inspiring my sewing choices. So here’s the first one. There’s definitely a theme going on too by the way. This summer heatwave has got me dreaming of exposing as much skin in my makes as is morally possible.
All credit goes to the original websites. The images were found on Pinterest. Click the pics for the links!
Backless dresses
I just love the colour of this dress and the sweet circle skirt. This one is hopefully in the planning already.
This one is really nice too. I love the lilac colour and the bow is a little less obvious than in the first dress so is more wearable.
A deep v-neck back will always make my heart a-flutter and I adore Republique du Chiffon‘s patterns already. This one’s definitely a winner!
A special mention goes out to the above which isn’t a backless dress, but is very wearable during the summer. And I adore the picnic blanket feel of the dress overall.
Loose fitting garments
I’ve grouped these together as I can imagine making an amalgamation of the three. I really like the buttons on the first one, the pockets of the second and the colour of the third, but they’re all great loose-fitting dresses.
The floral print, the gathered skirt and the straps all make this a lovely dress. I also love the longer skirt and will be replicating this (in a floral cotton obvs) soon, complete with a midi skirt I think.
Open-back tops
An open back blouse is the perfect casual wear in this hot weather and this one would be great made up in a lighter colour.
I love this tiny pocket tank pattern hack, especially with its beautiful back detail. I think this would work really well in a floral print.
What do you think? Have any of these inspired you too?
Independent sewing company By Hand London has released a new pattern. Inspired by their friend Zeena Shah, the BHL girls have created the Zeena dress, with its full skirt and pretty kimono sleeves.
Zeena comes in a short or long length and has a box pleated skirt and hidden side seam pockets. The great thing about the dress is that it’s a quick make and the girls say it is their easiest and fastest sewing pattern to date.
So far there’s only a few examples online; one from Ooobop and another from Fiona, whose checked version is lovely. I’m excited to see more versions popping up over the next few weeks though. Especially as it can be downloaded straightaway.
The Zeena dress can be purchased and downloaded here.
Are you planning on making a Zeena dress? What do you think of it? I’d love to know!
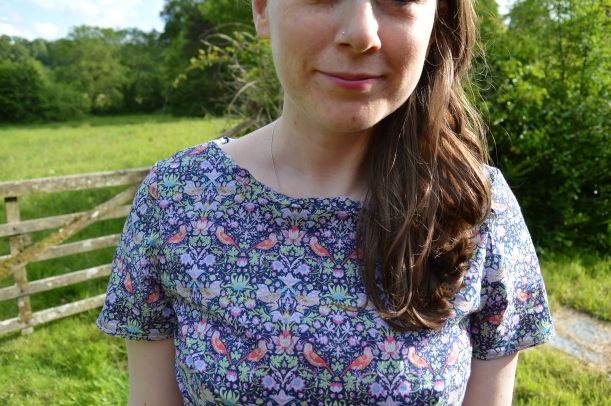
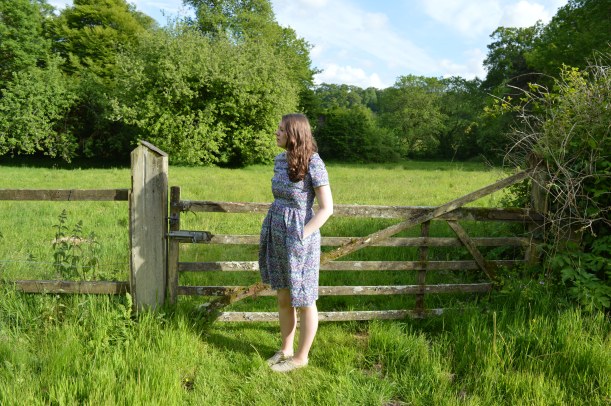
I haven’t done any sewing for a few weeks now, what with being in London for work and all, but I did make this beautiful (if I do say so myself) dress before I went. I don’t really know what to say about this dress, except that it’s another Emery pattern, in a Liberty Strawberry Thief print. I really love my Liberty print!
Despite making quite a few of these dresses now, this Emery still turned out differently, even though I followed the same instructions. I’m not sure whether I was a little bit tighter with the seam allowances but this one was bigger in the waist and bodice than any of my previous attempts. Hmmmm.
I’m also a massive fan of the length of the Emery dress, but the last one was just a little bit too long. So I shortened this one quite a bit and now the length is perfect for me.
I loved working with the Strawberry Thief fabric and I loved that it had quite a straight print as it made me really take notice of how I cut it and of making each part match up. I’m really pleased with how it turned out.
The only thing that’s slightly annoying me is that I made a facing for the neckline. Although I love facings generally, this one seems a bit bulky in the front and needs pressing down. My initial plan for this dress was to make matching bias binding for the neckline and arms, but I cut out the facing before remembering my plan and didn’t really want the beautiful fabric to go to waste. I think, in the future, I may take it out and try the bias binding option.
Like the other Liberty fabric, this one too is very thin but I’m sure I’ll get a lot of wear out of this dress. Plus, it’s Strawberry Thief! Who doesn’t like birds picking fruit from a tree on their clothes?
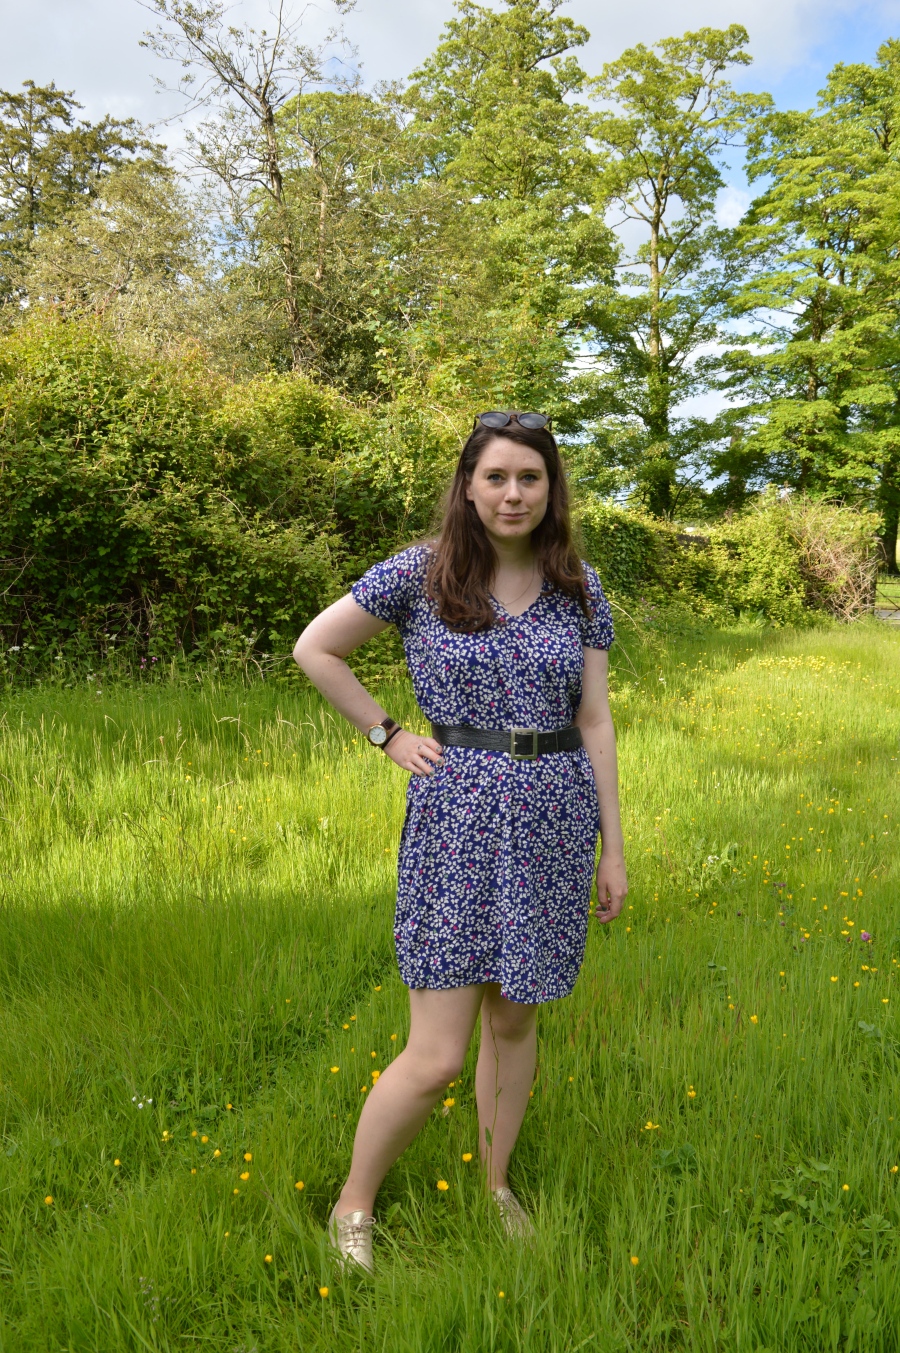
After scouring my DIYs and Crafts Pinterest board, I remembered a tutorial I’d pinned ages ago for a V neck dress. The tutorial was for a maxi dress, but I don’t wear maxi dresses that often, so I shortened it quite easily. The whole tutorial was pretty self-explanatory and called for four rectangular pieces of fabric according to your measurements. Sounds easy, right?
I did have to make some adjustments, mainly to the arms and top, as otherwise the dress would have swamped me (it still needs a belt to give it some shape otherwise it kind of looks like a tent). I brought the arms in a bit, so the dress would have less of a cap sleeve look and brought the top in quite a bit too, but all in all, I really love this dress. It’s so versatile and has a nice drape thanks to the viscose fabric. I also love the V neck shape. And best of all, I can slip it over my head so no need for a pesky zip. Yay!
Anyone else use Pinterest tutorials for ideas? I’d love some more inspiration!
Also, sidenote: the belt was given to me by my Dad who wore it as a 13 year old!!
This Emery kind of reminds me of a 50s dress. I know that’s the look the Emery is going for anyway, but the fabric is very 50s inspired and seems to suit the pattern well. I initially picked it up as I loved the purple roses on a white background and thought it would make a great summery dress. There are also touches of green around the roses too, which I love.
The great thing about this fabric is that it is great for hiding a few errors. I need to redo the neckline at some point and hem it (I hate hemming!), but I may keep this version longer than the other Emeries I’ve made. What do you think?
I didn’t really love working with this fabric but I think that is because I used Liberty tana lawn for the previous Emery I made and that’s a dream to work with.
This one will probably stay in my ‘to finish’ pile for a little while while I work my way through the other sewing projects I have to do and I’ll hem it on a rainy afternoon sometime.
I feel like my sewing style is very samey at the moment, but to be perfectly honest, I’m enjoying making fit and flare dresses and tops, as that is what I wear most of the time anyway. Therefore it makes sense to me to add them to my wardrobe. There are definitely more Emeries to come soon too. However, that’s not to say that there isn’t anything different in the making either. I’m currently planning a Francoise and another pair of trousers soon. And that’s after the next few dresses I have to post about.
This Emery is the wearable toile I made in preparation for my friend’s wedding and the first Emery I ever made (I’ve made three more since then). I used the same fabric as one of my peplum tops: a really lovely fabric from Ebay with a slight stretch.
I’ve mentioned my love for the Emery before, but I just find this style so easy to wear and it’s really classic. I have actually passed this version on to my Mum as she loved the fabric more than I did and loves wearing bright colours. So yep, more Emeries to come. Please stick with me for a while.
I’m sure you know by now how muchIlovePinterest. I use it for general crafting inspiration or for looking up a pattern that I’m thinking of making before I take the plunge.
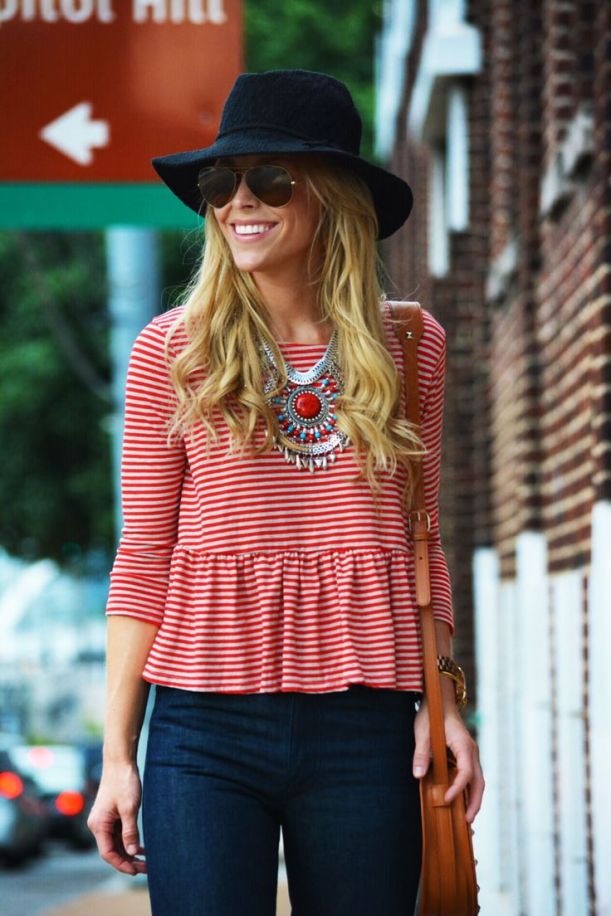
Lately I’ve been searching for the perfect peplum top pattern: one that isn’t too tight or structured but is a looser, more relaxed fit. Although I really wanted to like Republique du Chiffon’s Marthe top, the fit just wasn’t great at all on me and it was far, far looser than I thought it would be. So I went back to the drawing board and consulted Pinterest.
I’ve found some amazing peplum tops on Pinterest, the best of which I’ve included below. More can be found on my Pinterest board here.
Image via Pinterest. Click for link
Image via Pinterest. Click for link
Image via Pinterest. Click for link
Image via Pinterest. Click for link
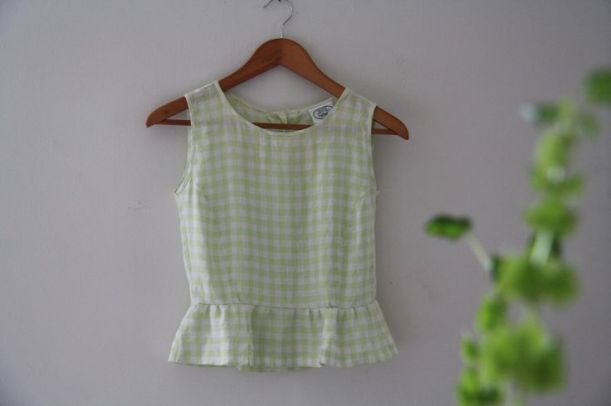
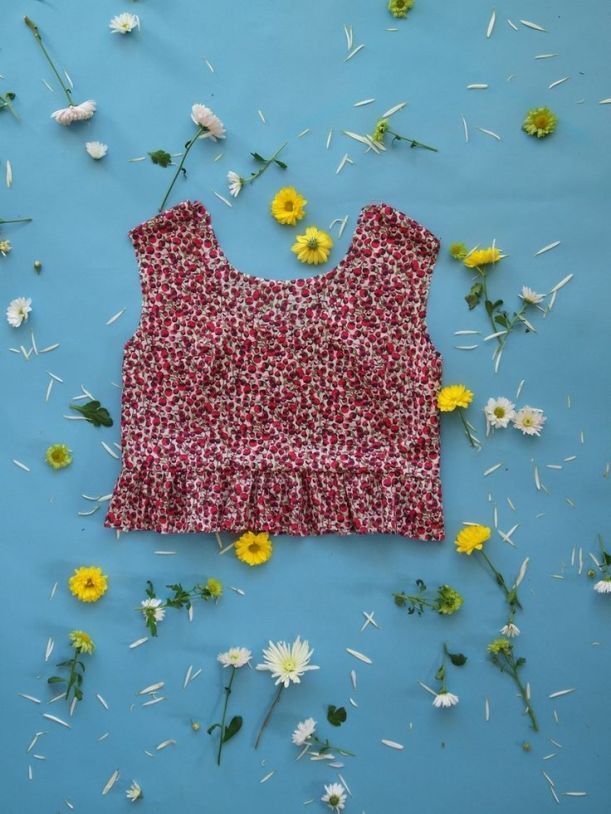
Pinterest is also how I found out about Cotton and Curls. There are loads of great DIYs on the website, including this one, which I loosely followed. The instructions say to copy a loose, boxy top you already have, so I kind of made it my own with a shop-bought peplum top I love and a bit of self-drafting thrown in.
I have self-drafted before and it is tricky to get something right (it’s far easier to follow a pattern). But there’s also a great sense of achievement when something you draft goes according to plan. This first attempt worked out well, although I did way underestimate the measurements of my top and had to add in extra fabric at the sides. This is covered by the busy print though so it doesn’t really matter. The only real problem I had with this attempt is that it is quite short, but I blame that on not having enough fabric to make a longer peplum. It’s still wearable with a high waisted skirt or jeans though and I even made a cute patch pocket to compensate.
The brilliant thing about making a top is that you can use leftover fabric scraps to make it. I had plenty of this Ebay find left to make a top and could afford to make a longer peplum this time. For this one I wanted to make the sleeves shorter, lengthen the bodice and make it a little smaller. I quite like how it came out and the material is a lot lighter than the previous peplum top, although in hindsight I think perhaps I should have lined it. The fabric is the same as I used in my green gables dress, but I’ve realised that I don’t very much like the feel of it, so it may not be worn as much as I’d planned anyway.
I have plans to adapt this pattern to make a few different peplum tops next, including a long-sleeved peplum top from fabric I bought in London, a more fitted top and a sleeveless version. Any peplum tops in your sewing plans?

 I mentioned quite a while ago that I’ve been wanting to move to a self-hosted blog space and change the Street Style Wales name. Well, the time has finally come. You may have guessed by the name of this post that I’ve finally done it. I’ve moved to www.andshemade.co.uk. I’ll be posting the same content as I’ve been posting here, plus a little extra, so nothing much will change, although a change is as good as a rest, as they say.
 You all know by now how much I love the


